728x90
매장 안내를 의미하는 화면을 만들 예정이다.
페이지 특성상 특별한 기술도 필요 없을 것 같고
가게를 소개하는 내용만 잘 구성해서 보이면 될 것 같다.
우선 이전 포스팅에서 만든 NestedScrollView
하단에 ListView 추가 후 내용을 때려 넣으려고 한다.
우선 ShopGuide 클래스에서 아래와 같이
ListView와 그 자식으로 Text를 추가해봤다.

디버깅하여 에뮬레이터 화면을 보면
아래와 같이 추가한 텍스트가 잘 표현되는 것을 볼 수 있다.

이제 그 아래에 공백과 사진을 넣어보겠다.
아래와 같이 Container로 공백을 넣었고
그 아래에 이미지도 추가했다.
이전 포스팅에서 MediaQuery 클래스로 size.height를
이용해 핸드폰 화면 높이를 얻었는데 Container는 화면 높이의 2%만큼
이미지(shop.jpg)는 화면 높이의 35% 만큼 사이즈를 잡았다.
이렇게 처리해야 핸드폰 사이즈가 달라도 비슷한 비율로
공백과 이미지 크기로 구성할 수 있다.

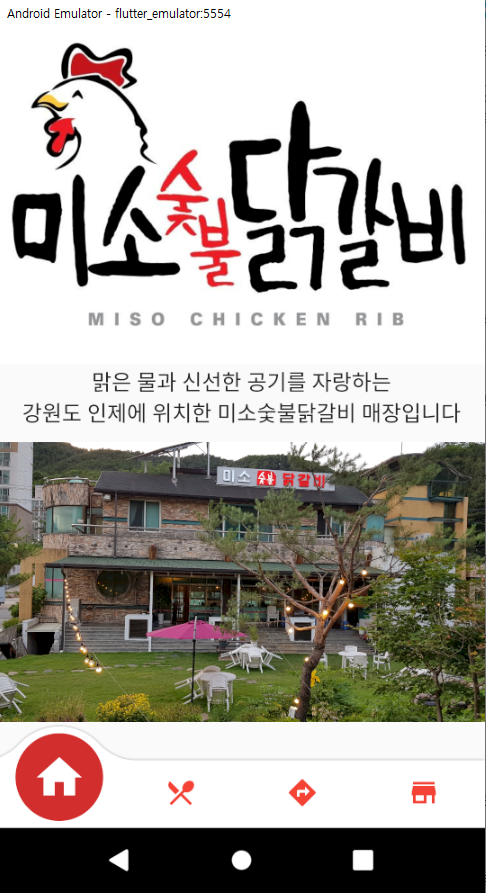
위 소스 코드는 아래 화면과 같이 잘 표현되었다.

그리고 그 하단에 가게 소개를 위해 필요한 내용을 계속 추가하겠다.

ShopGuide 클래스 소스 코드는 아래와 같다. 고민하지 않고 쭉 나열했는데
나중에 시간되면 효율적으로 표현할 수 있는 방법에 대해 고민해보겠다.
import 'package:flutter/material.dart';

class ShopGuide extends StatelessWidget {
  @override
  Widget build(BuildContext context) {
    final Size size = MediaQuery.of(context).size;

    return Scaffold(
      body: NestedScrollView(
        headerSliverBuilder: (BuildContext context, bool innerBoxIsScrolled) {
          return <Widget>[
            SliverAppBar(
              expandedHeight: size.height * 0.42,
              backgroundColor: Colors.white,
              pinned: false, // true 처리 시 스크롤을 내려도 appbar가 작게 보임
              floating: false, // true 처리 시 스크롤을 내릴때 appbar가 보임
              snap: false, // true 처리 시 스크롤 내리면 appbar가 풀로 보임 (floating true조건)
              flexibleSpace: FlexibleSpaceBar(
                centerTitle: true,
                title: Image.asset('Assets/Image/title.png'),
              ),
            ),
          ];
        },
        body: ListView(
          children: <Widget>[
            Text(
              "맑은 물과 신선한 공기를 자랑하는\n강원도 인제에 위치한 미소숯불닭갈비 매장입니다",
              style: TextStyle(fontSize: 16),
              textAlign: TextAlign.center,
            ),
            Container(
              height: size.height * 0.02,
            ),
            Image.asset(
              'Assets/Image/shop.jpg',
              height: size.height * 0.35,
              fit: BoxFit.cover,
            ),
            Container(
              height: size.height * 0.07,
            ),
            Text(
              "누가 생산하나요?\n",
              style: TextStyle(fontSize: 18, fontWeight: FontWeight.bold),
              textAlign: TextAlign.center,
            ),
            Text(
              "안녕하세요. 요식업 경력 20년차 박금호입니다.\n저희는 모든 양념을 직접 만들어 요리에 사용합니다.\n또한, 가게에 있는 텃밭에서 필요한 채소를 키우고 있어서\n항상 손님들께 건강한 음식을 제공하려고 노력합니다.",
              style: TextStyle(fontSize: 15),
              textAlign: TextAlign.center,
            ),
            Container(
              height: size.height * 0.02,
            ),
            Image.asset(
              'Assets/Image/boss.png',
              height: size.height * 0.6,
              fit: BoxFit.cover,
            ),
            Container(
              height: size.height * 0.07,
            ),
            Text(
              "어디서 생산하나요?\n",
              style: TextStyle(fontSize: 18, fontWeight: FontWeight.bold),
              textAlign: TextAlign.center,
            ),
            Text(
              "강원도 인제입니다.\n설악산 국립공원과 자작 나무숲으로 유명하고\n자연경관이 수려한 곳입니다. 공기 좋고 물 맑은\n인제에서 건강한 닭갈비를 만듭니다.",
              style: TextStyle(fontSize: 15),
              textAlign: TextAlign.center,
            ),
            Container(
              height: size.height * 0.02,
            ),
            Image.asset(
              'Assets/Image/tree.png',
              height: size.height * 0.5,
              fit: BoxFit.cover,
            ),
            Container(
              height: size.height * 0.07,
            ),
            Text(
              "어떻게 다른가요?\n",
              style: TextStyle(fontSize: 18, fontWeight: FontWeight.bold),
              textAlign: TextAlign.center,
            ),
            Text(
              "하나부터 열까지 모든 것을 직접 만듭니다.",
              style: TextStyle(fontSize: 15),
              textAlign: TextAlign.center,
            ),
            Container(
              height: size.height * 0.02,
            ),
            Image.asset(
              'Assets/Image/guide1.png',
              height: size.height * 0.65,
              fit: BoxFit.cover,
            ),
            Image.asset(
              'Assets/Image/guide2.png',
              height: size.height * 0.7,
              fit: BoxFit.cover,
            ),
            Image.asset(
              'Assets/Image/guide3.png',
              height: size.height * 0.7,
              fit: BoxFit.cover,
            ),
            Image.asset(
              'Assets/Image/guide4.png',
              height: size.height * 0.7,
              fit: BoxFit.cover,
            ),
            Container(
              height: size.height * 0.07,
            ),
            Text(
              "매장에 방문하셔서 맛있는 닭갈비 드시고 가세요!",
              style: TextStyle(fontSize: 16),
              textAlign: TextAlign.center,
            ),
            Container(
              height: size.height * 0.02,
            ),
            Image.asset(
              'Assets/Image/inside1.jpg',
              height: size.height * 0.4,
              fit: BoxFit.cover,
            ),
            Image.asset(
              'Assets/Image/inside2.jpg',
              height: size.height * 0.4,
              fit: BoxFit.cover,
            ),
            Image.asset(
              'Assets/Image/parkinglot.jpg',
              height: size.height * 0.4,
              fit: BoxFit.cover,
            ),
            Image.asset(
              'Assets/Image/shop2.jpg',
              height: size.height * 0.4,
              fit: BoxFit.cover,
            ),
          ],
        ),
      ),
    );
  }
}
디버깅을 돌려보면 에뮬레이터에 다음과 같이 앱이 실행되며
생각한대로 텍스트와 이미지들이 잘 표현되었다.
728x90
'플러터' 카테고리의 다른 글
| 플러터 - Stateless Widget과 Stateful Widget 차이점 (0) | 2021.01.13 |
|---|---|
| 플러터 화면 추가 - 메뉴 안내 추가 (0) | 2021.01.03 |
| 플러터 Sliver 효과 - 앱 바 애니메이션 스크롤 (1) | 2020.12.31 |
| 플러터 - 애니메이션 탭 메뉴 추가 (1) | 2020.12.29 |
| 플러터 디버그 띠 표시 삭제 (0) | 2020.12.28 |